
 Anti-detect Browser


-
25830Global Ranking
-
864Country/Region Ranking
-
1.77MFollowers
-
917Videos
-
58.3MLikes
-
New Videos12
-
New Followers-2352
-
New Views1.23M
-
New Likes67.45K
-
New Reviews298
-
New Share751

Florian Gadsby Data Trend (30 Days)
Florian Gadsby Statistics Analysis (30 Days)

Florian Gadsby Hot Videos

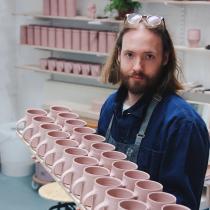
Florian Gadsby


Together with all the blue test tiles unpacked from the kiln yesterday, there was also this sleek, medium vase with a little line across one face. It’s a decorative addition, a simple protrusion that gives the pot some direction or a face, without it you could display the form from any angle but with it the orientation is clear. Now, I always get a TON of questions when I show these glazing videos, asking why I glaze the outside first, instead of doing it the conventional way, which is by coating the inside and then the outside. So, the first thing to realise is that not all glazes are the same, depending on what the recipe contains, some dry into a relatively solid layer, whilst others turn very powdery and soft, this is the latter. I’ve also found that the way to create the most consistent exterior layer of glaze is to dunk them like this. Thus, if I coated the interior first, when it comes first to submerge the vessel by pressing on the inside form, there’s a chance the interior could be damage by my pressing down and my forearm could also damage the glaze around the opening. By doing it the other way around, the interior remains unglazed so I can press downward as hard as I like and I also find it a touch easier to handle the exterior of the vase carefully when pouring the glaze out as I can easily see and feel what I’m doing. It’s counterintuitive perhaps and it’s definitely dependant on the type of glaze, but this is what works best for me. #vase #ceramic #pottery #handmade #reductionfired #madeinlondon #craftsmanship
1.16M
 37.36K
 3.23%
3.23%
 43
43
 98
98
 397
397
Florian Gadsby

I know there’s other ways of glazing shapes like this, such as first coating the inside and then dunking the outside, or attempting to dip it all at once, but the reason I do it the other way around is as follows. The first thing to understand is that this specific glaze dries into an absurdly fragile layer. If I were to coat the interior first, let it dry, (which you must do in order for the walls to become desaturated with water—thus being able to absorb water again when the exterior is dipped), and then push it underneath the glaze like so, there’s a chance I’d chip or damage the interior surface as it’s plunged into the bucket of glaze. I personally feel as if I can handle the vessel more delicately if I do it the other way around, this way I’m pushing the jar into the glaze without worrying about harming the interior form. Yet, if you have a glaze that dries into a harder layer, then by all means do it the other way around, this is just what works for me. As for deciding to glaze these in two parts, I do this because by dipping the exterior like so and by slowly pulling it out of the glaze, I’m able to achieve a really flush, consistent layer on the outside. If I were to dip the entire vessel, pull it out of the glaze and then pour the contents back into the bucket, there’s a high chance that the glaze on the inside would spill over the exterior form. The large volume of glaze that flows out can be enough to manoeuvre the glazed that partly absorbed to the outside shape, creating an uneven layer. In this instance, unevenness is my enemy, which is precisely why I do it the slower, more careful way. #jar #pottery #ceramics #clay #glaze #oddlysatisfying #asmr
786.12K
36.78K
4.68%
39
121
417
Florian Gadsby

Here’s what the next few days will look like for me, with the latest batch of work all glazed, all that remains is tidying up the glazed surface that encases the clay form, with special attention spent on the bottom of every pot, the base, which must be wiped clean of any glaze residue otherwise they could fuse themselves to the kiln shelf. It’s a satisfying process, provided the glaze doesn’t chip and tear away more than I’d like. Thankfully, after this glaze has dried out for a day or so it becomes powdery and soft, yes it comes off on your fingertips and gets everywhere, but it also makes it relatively easy to scrape back and fix. Chips are simply flooded with new glaze from a brush before being blended into the surrounding area and any raised patches, like the tong marks, are fettled back to a flush surface. The key is not rubbing away too much as to create a thin patch and that’ll show in the glassy surface once fired, yet this is easier said than done. Overall glazing is a process I could live without, I’ve become rather efficient and decent at coating pots evenly, even with a glaze that takes time to settle on the form and given the chance will dry into a bumpy layer, it’s all practice I suppose and it’s rather miraculous how much faster I am now as compared to in 2020. A good audiobook and a handful of boards to fettle through is at least time well spent. #pottery #glazing #oddlysatisfying #craft #asmr #mug #glaze
324.22K
12.39K
3.82%
28
46
139
Florian Gadsby

I’d love to hear your thoughts on these bowls… This week’s YouTube video covers a topic you may have seen me writing about a fair amount lately and that’s how I want to use these bronze filings more intentionally in my work, as compared to simply wedging them at random into my clay, the idea is to use them from more of a design-led perspective, to create directional points on the vessel that end up linking groups of work together. For a much more thorough explanation of my thoughts and ideas and how I did this, make sure you watch the fully narrated video on my YouTube channel, which you can find via the Linktree in my profile’s biography. I won’t lie, the arbitrary dots have been getting slightly on my nerves. There’s a certain amount that has made it into my reclaim and they keep coming back and marking pots, (even those I’m trying to purposefully imprint with red metallic spots, like these bowls, hence my annoyance). I see the beauty in their random appearance, yet at the same time, if by adding them myself I can introduce a new element of design that’s both purposeful and creates more interesting groups of work, then that’s a good thing in my mind. Thanks so much for watching and do let me know what you think! #bronze #pottery #oddlysatisfying #howto #craft #ceramics #maker
137.48K
12K
8.73%
13
27
129
Florian Gadsby

My YouTube video this weekend is one I promised you recently, it’s all about chucks, chums and the newly named cheeks, the etymology had to be preserved. These are custom clay tools that fit inside the pots you make to make trimming easier and in this week’s upload, I’m demonstrating both how to throw them and use them after the heavy, sturdy pieces have turned leather hard. If you’d like to watch a much longer explanation, you can find the fully narrated video via the Linktree in my profile’s biography. Chucks, (I’ll use this as the universal term for the three distinct shapes from hereafter), are tools I find the most useful when trimming many multiples of the same shape as they help eliminate time wasted centring pots and attaching them securely down onto the wheel, instead the chuck is centred and each vessel is simply slotted over it for trimming, the solid mass of clay holding the pot in place. Not only that, but the chuck helps to preserve the shape of the opening of the pot, it can even correct oval or misshapen openings, as the leather hard clay of the pot that’s still relatively soft adapts to the roundness of the chuck as it’s inserted over it. I even use a chuck on all my handles vessels to quickly reshape the rim just in case they’ve been drawn into an oval shape as the new appendage pulls the rim to one side. Thanks so much for taking your time to watch if you happen to click over onto my YouTube channel, it’s very greatly appreciated. #pottery #chucks #tools #toolsofthetrade #ceramics #tutorial #clay
111.07K
4.09K
3.68%
49
20
131
Florian Gadsby

It feels great to be testing glazes again, this time it’s a search for a blue I like, one rich with character, gradients of tone, crystalline flecks, crackling and breaking dramatically over sharp edges. All of that is much easier said than done, hence this expansive round of tests that I’ll hopefully be reduction firing soon, so make sure to check back over the coming week or two if you’d like to see an ocean of glassy blue tiles. I’m sure some will be failures, there’s always a few, but I’m also testing some iron slips and some gun-metal greys, bonuses, if they fire successfully. There isn’t much to the process itself. Anyone that’s mixed up a whole range of test tiles like this will know it’s slow and careful work, yet you try to get into a rhythm that’s relatively fast otherwise hours can disappear very quickly. The most important part to get right is obvious, the right material weighed out to the correct amount, yet again, that’s easier said than done as all it takes is a tiny lapse of concentration for a glaze to be mixed incorrectly, a phone-call, a knock on the door and so on. We’ve all been there. #glaze #test #testtile #glazing #satisfying #pottery #ceramics
72.84K
5.52K
7.58%
9
17
46
Florian Gadsby

If you’d like to watch both the throwing and the trimming of these trinket boxes or store jars, you can find a link to the fully narrated video via on YouTube via the Linktree in my profile’s biography. These are deceptive objects. Simple, yes, yet trimmed to an astonishing level, my fault really for accidentally throwing the lids far larger than need be… I’m sure I’m not the only person that’s measured the opening of their jars only to then knock it larger, or smaller, without realising. Thankfully, my general approach when making lidded ware is to throw the lids themselves thicker than need be, not the overhang itself, that was too much on these, but the vertical locating flange, for instance, is a segment of the pot I always throw more substantially, this way it can be trimmed back to fit the vessel underneath it no matter what. I’ll be trimming the underside of my lids regardless, so this fraction of additional material acts like a safety net of sorts. Yet, that’s no excuse for the portion of the lid that’s overhanging to this degree, the next time I make these I’ll spend a few extra moments measuring. These are useful pots though, the wider opening means I can easily reach inside to fish out salt or spices, or it can be used for trinkets, rings and the like, in fact, you can put anything inside, it’s not my job to tell you what to do with these. #pottery #satisfying #clay #stoneware #jar #ceramics #maker
61.93K
4.27K
6.9%
6
17
33
Florian Gadsby

These lined vases have been some of my favourite pots to emerge from the kiln lately, they’re fundamentally simple objects, which means getting the proportions right is paramount in their success, yet it’s the line that can really change them. The initial idea with these protrusions was for them to act like a continuation of the rim that travelled down the side of the pot, thus allowing the dramatic glaze breaking to not only encircle the sharp lip of the vase, but one face of it as well. It serves no purpose beyond giving the piece an obvious way to display it and they’re about the closest I get to hand-building. This process is slow and the coil must be allowed to dry in-between stages as it’s soft and tacky initially, which isn’t the best quality for the clay if you indent to create a flush, smooth mark. So, once joined roughly I let is sit for a while, (normally whilst I trim more vases and attach the coils), then I can go back and start work on the first, refining and sharpening the protrusion. It’s slow work that’s a nice counterpoint to the more rapid throwing my days and normally filled with. #vase #howto #craft #clay #ceramic #pottery #studiopottery
58.84K
3.87K
6.58%
9
20
39
Florian Gadsby

After recently making a batch of low jars, I was tempted to create another that’s even lower and wider, and this is what I came up with. My main concern is the fine rim of the body section warping. I hope it’ll hold, and normally the wadded-up lid that’s placed in-situ as it fires is enough to keep it round, yet when scaling things up, or down in this case? There’s always the inevitability of things going wrong. All in all, it was easier to put together than I thought. The throwing of the two halves sort of felt like throwing two plates, so my second concern is the vessel warping or moving as it dries out to bone dry before the biscuit firing can be done. Thus, the box has been drying beneath plastic for a week or so, unwrapped daily and allowed to breathe before being smothered again. I’m not sure which colour to glaze this, white, black, pale-green, blue perhaps? With so many new buckets of glaze in the workshop I’m having a much harder time deciding how to coat the pots I make. #jar #pottery #tutorial #studiopottery #contemporaryceramics #box #craft
53.82K
3.13K
5.81%
2
18
36
Florian Gadsby

I know what I’m about to write is immensely trivial, but it’s a relatively big change in my practice, and that’s moving on from a hair brush for waxing, to a foam brush like this. I’m sure there are pros and cons for each but this tool holds more wax so I can wax for longer and it’s also more versatile, as I can use its side for fine details, such as the waxing the smallest feet on my tiniest bowls, to waxing larger expanses of bare clay, like on the underside of these mugs or plates. Either way, trivial yes, but a change to a tool that’s so engrained in my muscle memory feels peculiar and it took some getting used to. The main difference is that the wax seems to be pulled out of the foam more quickly by the absorbent stoneware and if this catches you off guard then it drags the entire pot off centre, potentially tipping it over. By the way, that last daub that I do is to flood my maker’s mark and properly seal it, otherwise this little intricate crevice can fill with glaze that is somewhat irritating to needle out. Cleaning it out every now and then is fine, but if I had to do it for every single mug, I glazed then it would add a good 10-20 seconds per piece, 20 seconds x 120 mugs is 2400 seconds, which is 40 minutes. It’s all about efficiency in this workshop. #waxing #wax #pottery #potteryvideos #craftsmanship #maker #howto
51.57K
2.59K
5.01%
8
12
29
Florian Gadsby

These pourers aren’t fun to trim, they topple to either side when upside-down and flattening and thinning the walls leads to creating ridges where the spout itself protrudes. I could not trim to the top but you know me, there are some things I have to do despite them being difficult. Thus, for these, I trim and create those marks and afterwards I spend some time carving them back, to create a flush surface again, which I then fettle over with a sponge-on-a-stick and then compress with my fingertips. The best part about all of this though, is being able to work the actual pouring edge back to being incredibly crisp, which means when used it should cut through the liquid wonderfully, resulting in a smooth, even pour. I even fractionally wipe the glaze back here so that the spout isn’t obliterated and smothered in glaze, (this can thicken the lip, rounding it and causing it to pour poorly). This extra work means they certainly take longer to create but it’s well worth it in the finished product, provided I don’t mess them up hereafter. #pottery #jug #qualitycontrol #carving #ceramics #studiopottery
50.96K
2.92K
5.74%
3
14
22
Florian Gadsby

Here are two more clay bodies that I’ll be testing in my next firing, both are stoneware, yet they simulate porcelaneous clays, one is very smooth and the other is heavily, painfully grogged. Both offering their own unique challenges to work with as compared to my usual 10% grogged stoneware, if you’d like to watch my struggle with these in a longer format film, my recent upload on YouTube, (there’s a link in my profile’s biography), discusses working with these types of clay in far greater detail. It’s incredible how much you need to adjust your technique for small differences in clay. How they’re thrown and lifted off the wheel and how they’re trimmed, the clay feeling so dense that it’s tricky for the blades edge to catch purchase, I can blame these differences on the undulations the smaller indented bowl has. White clay for white glaze, that’s the idea, with a black clay also being tested with a similar, matte black glaze, the plan being to find some simple combinations I like to create some simple, black and white wares from, groups and pairs, light and dark. #maker #ceramicist #bowl #oddlysatisfying #asmr #pottery #ceramics
45.84K
3.71K
8.09%
4
21
20
Florian Gadsby

I’ve never felt like the plates I make, (be it side-plates or dinner plates), really fit within my style, they’ve felt like outliers, forms that were visually more traditional in design and therefore never felt right when displayed outside my other works. Thus, this weekend’s YouTube video and the exploratory making it shows, is my attempt to fix that, and this short montage of moments from that process is only a tiny portion of the longer, almost hour-long narrated version you can find over on my YouTube channel, (a link to which you can find via the Linktree in my profile’s biography. That film covers everything you don’t see here, together with my detailing and fussing over each small step along the way, together with sharing numerous tips and tricks on throwing and trimming such shapes and some discussion of my design philosophies. It’s a long one this weekend, so thank you so much for taking the time to watch if you do happen to click over and let me know what you think of these new, slightly more complex, plates. #plates #tableware #craftsmanship #maker #pottery #ceramics #satisfying
45.13K
3.82K
8.45%
4
33
49
Florian Gadsby

The same few questions always come up when I show the handling process, the first asking whether I attach these blanks immediately, or whether they’ll allowed to stiffen up before being joined and pulled into their final shape. Waiting for them to dry does feel intuitive, yet in this instance it only makes the process more difficult, the blanks become harder to blend into the cup smoothly as the clay is simply more tenacious, you have to work harder to create a seamless blend between the two. Equally, when it comes to pulling the length into its final shape, if the stoneware is firm, you’ll find it’s more difficult to stretch out, yes, you may have to exert more control, as softer clay tends to collapse and tear more easily, but you’ll find it’s easier to make flowing, curved shapes when the clay is on the softer side. Thus, once the blanks have been pulled, they are immediately used, I want them soft, in fact, if I have many handles to pull or if it’s a particularly hot day, I’ll stack all the blanks up and will wrap them in plastic, as the wood tends to wick moisture out of them very quickly, drying out side of them and making them more difficult to pull. It’s a skill that’s initially a nightmare to learn, yet once the basics have engrained themselves in your muscle memory it becomes a joy, you’ve just got to persist through the pain. #handles #handlepulling #oddlysatisfying #clay #pottery #ceramics
44.59K
2.48K
5.55%
12
32
100
Florian Gadsby

Proportion is EVERYTHING with these vases, with every type of pot honestly, but with these in-particular, there are some strict rules I follow to make sure they ‘feel’ right proportionally, not squat or heavy or unbalanced, and they’re as follows: First and foremost, the lower tapering part has to account for half or more of the overall height. If it’s shorter than the angular section on top, then it begins to feel clumsy and top-heavy, stumpy as compared to elegant. Secondly, the base, (and yes it can be trimmed narrower), has to be narrower than the pinched section towards the top, where the two walls meet. If the foot portion is wider or the same width, then again, the vessel loses its elegance. Third, the line around the waist, (where the lower half and the top half meet), has to always be the most outward point, other angles can be equal to it, but they can never splay out further, otherwise the form becomes top heavy and it throws off the proportionality. These might sound restrictive but sometimes it’s interesting to see how you can push the boundaries within a certain set of rules, moreover, these are just the rules I apply to myself when making these, by no means do you have to be a potter who creates according to order but it works for me, and I find I create the best vases when I follow these rules. #vase #wheelthrownpottery #maker #clay #satisfying #pottery
39.68K
3.27K
8.25%
14
19
44
Florian Gadsby
Small stepped bowls, from start to finish, pots with absurdly tall feet, good for gripping onto as you eat from or drink from them. Thrown from approximately 450 grams of clay with a vast majority of that being left in the thick foot. I always prefer to throw them with too much clay in the base as compared to leaving a touch too little, this way I can always turn the pedestal-like base shorter, if necessary, but you can never easily add height back to pots like this, unless you do it when the pot is still on the softer side, which yes, is something I admittedly do from time to time. Bodging, as I’ve heard numerous potters call it, tacking on additions to provide more material to trim later or dropping in a ball of clay and smearing it on the bottom to further pad out the base—not everything has to be perfect at the thrown stage and changes can be made, you’ve just got to make sure your timing’s right. Get it wrong, try to add clay too late and that’s when things can go awry, cracks form around the knitted-on stoneware, leading to deep lines in the clay-work the glazes will pool into, this can seal them but they’ll still always remain present. Oh, and don’t you like the new callipers in the video? They’re nautical dividers that I’ve screwed to be incredibly tight, the best part though is their sharp tips, which score a beautiful fine line in the foot, with this set it ensures the diameters of all these feet are the same. #pottery #ceramics #satisfying #craft #maker #bowl #tableware
38.5K
2.85K
7.4%
7
15
43
Florian Gadsby

These are the earliest forms of these new black clay and glaze tests, wonky bowls unfortunately, due to being trimmed too finely and positioned right next to the burners in the kiln. It seems this blend of stoneware clays doesn’t hold up quite so well as compared to my usual mixture, which means from this point on, future pots will be potted more thickly and placed in more sheltered places inside the kiln. The very basic idea is my want for a simple black clay and glaze combination that end up feeling as if the vessels aren’t even glazed, yet I want just enough of a layer to cover once grog filled gaps and to smooth the forms a touch, (so I don’t need to be so fussy with the clay-work). Both bowls were reduction fired to cone ten, some 1290ºC, and along with the rims distorting a little bit, the bare clay bases also plucked away at the kiln shelf a touch, meaning they needed to be sanded a touch more than normal, (a task for which I use my @diamondcoretools diamond pads). With my typical stoneware, grinding back the clay too much reveals dull, grey stoneware underneath, but at least with this combination I can polish to my heart’s content without ruining any of the colour as well, all that’s revealed is even more black. Let me know what you think! #bowl #stoneware #experiment #satisfying #asmr #pottery
37.5K
3.58K
9.55%
6
39
34
Florian Gadsby

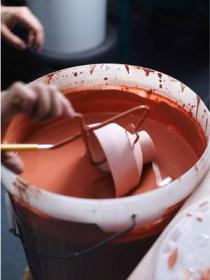
Here’s a better overview of some of the reduction fired blue test tiles that I unpacked from the kiln a few days ago. There’s a real mix of surface textures in these and that’s partly why I started with such a broad range of recipes as my search isn’t simply for a flat colour, it’s for a surface that’s a lot more characterful than that. I mix all of these recipes in-house from raw materials I tend to buy in bulk. Each recipe is then precisely weighed out, blended, sieved and dipped on a tile before a small code is scrawled on the back using whatever iron oxide I have at hand. Often, there are colours and surfaces I like, but they don’t feel as if they’d fit within my body of work or the range of tones I use. For instance, if a cobalt is too bold it’ll overpower the rest of my glazes, so whatever passes the test has to be visually slightly softer. That’s why I like the blue with the white borders so much, it takes the edge off the tone without completely dulling it down. This whitening also creates gradients, which I like in my surfaces, and lastly metal seems to really flux with the glass, creating small metallic rivulets in the glaze, which is another bonus. Which one do you like most? #blue #glaze #glazetest #pottery #ceramics #handmade #craft
37.21K
3.22K
8.66%
14
23
47
Florian Gadsby

If you’d like to watch through a far more detailed explanation of the throwing and trimming of these drippers/pour-overs, I’ve made a 25 video minute demonstration over on my YouTube channel, a link to which you can find in the Linktree in my profile’s biography. I’ve got to thank Joe, (@Joe Thompson), for creating such a superb guide for creating these, especially the printable template that comes with different shrinkage rates on it. I cut it out and made a cardboard guide that was wrapped in plastic tape to keep it from degrading as its plunged into the tapering tunnels of these as they’re thrown. In making them I had a conversation with a friend and coffee enthusiast, I didn’t quite realise the sheer amount of variables that there are that could affect the end taste. For instance, the angle of the walls, the size of the hole or holes in the bottom of the dripper, the type of filter used, the water and how coarsely ground the coffee is. The steeper the walls the more water pressure there is, meaning the rate at which is passes through the grounds is quicker, yet the hole beneath of course restricts the rate at which is flows, so in reality, what I’ve made are six different tests, which I hope to actually test, (with my friend perhaps), after these have been reduction fired. I know there’s a lot of opinions when it comes to objects like this, but really, it was a learning experience for me and a chance to create something I’ve never thrown before. I’ll learn a lot as they’re glazed and fired and tested, all of which will influence the next iterations. #pottery #coffee #v60 #pourover #coffeedripper #coffeetime #ceramics
30.21K
1.84K
6.08%
6
12
34
Florian Gadsby

Some people think I use specific rims to create my stepped forms, the types that have the exterior shape cut into them, so they can be used like a template almost, pressed against the soft spinning clay. Instead, the way I really do it, is simply by throwing a straight-sided form that’s then indented like so, with the sharp edge of a metal rib pressed into the wall, a crisp little ledge created. It’s not the easiest technique, especially if the walls are wafer thin, and much of what allows this to work is supporting the indentation from behind, from inside the pot, as pressure is exerted on the outside. Beyond that, there are two other important factors to making a successful mug, (in my opinion), the first tip will help you to throw a shape without any trapped, ‘useless’ clay in the bottom, and that’s simply throwing an internal form that has a distinct flat base with walls that jut upwards vertically, without any gradual curve connecting the two. If you leave the floor curved in a shape like this, the raised portion closer to the walls will keep the vessel bottom heavy as you can’t trim it away easily thereafter. The second tip is more ergonomic and that’s to create a lip that fits the shape of your mouth. I see so many cups that resolve in a thick, blocky rim, a form that simply doesn’t nestle into the corners of your lips. Instead, I throw the rim with a bevelled edge that comes to a sharp point on the outer portion of the wall, the sharpness is then softened with a chamois leather, yet it’s crisp enough to snuggle into the corners of your mouth. Think of a stool made with a shape that mimics your behind, comfortable, right? Well, the same can be said for a properly thrown lip. #pottery #howto #potterytutorial #clay #ceramics #maker #wheelthrownpottery
29.65K
2K
6.75%
10
5
33
Please join our TikTok Inspiration Facebook group
We'll share the latest creative videos and you can discuss any questions you have with everyone!

TiktokSpy from IXSPY
Digital tools for influencers, agencies, advertisers and brands.
Independent third-party company,Not the TikTok official website.
- Support
- Privacy Policy
Copyright@2021 ixspy.com. All Rights Reserved


